
I have seen programmers use tricks in Visual Studio that I will never begin to understand. But there is one tip that I use literally all the time, adding breakpoints into scripts.
What is a breakpoint?
Breakpoints are markers that you can add at any point in a script. They show where you would like to “pause” the code. They are incredibly useful for debugging scripts as they allow you to run the game and pause it where at a local point, then you can simply hover over any variable and it will tell you all the details of that variable at the time of the script pausing.
How to use breakpoints
This example will use Unity and C# scripts. Let’s take a hypothetical situation that is relatively common in implementing game audio. At some point in a game a player receives a power up and this power up changes the sound that plays when an action is performed – for example the gun shot sound is changed. But when you press fire, the sound that plays is the original gunshot sound.
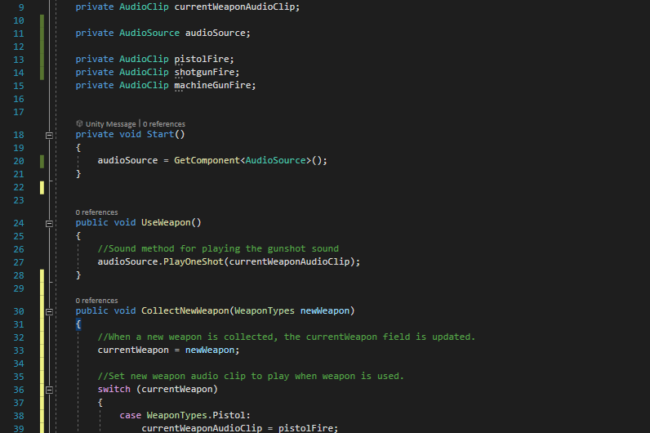
Take a look at this script – all it includes is 2 x methods. UseWeapon() which simply plays the gunshot sound and CollectNewWeapon() which sets which audio clip is to be used next time a weapon is fired.
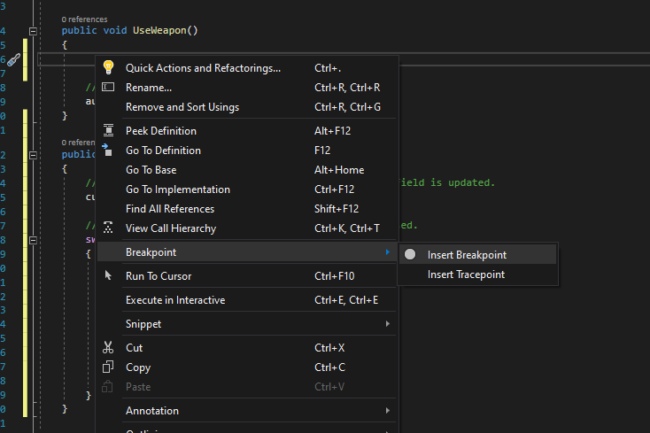
Next right click on line 27 (in the UseWeapon() method, immediately before the line “audioSource.PlayOneShot()” and go down to “Breakpoint > Insert Breakpoint” a little red circle will appear by your line numbers showing that break point has been added.

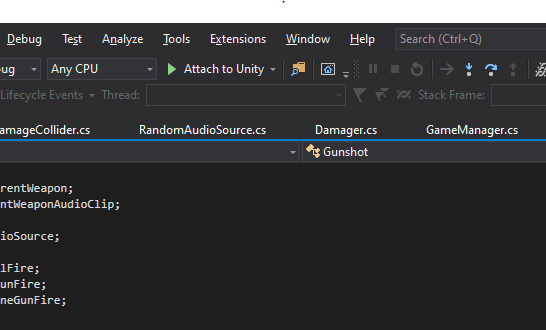
The last step you need to do to make sure that this breakpoint will pause your scripts when the game is running is to click “Attach to Unity” at the top.
Now go back over to Unity and play the game. When you press fire the game will pause and while leaving Unity in Play if you switch back over to Visual Studio you will see that the line that the game has paused at has been highlighter. If you now hover your mouse over the variable being used in the PlayOneShot Method, a little dropdown menu will pop up and show you that “currentWeaponAudioClip” is null.

So there’s the problem, the audioClip that is trying to be played is null, so it has nothing to play. This is because the currentWeaponAudioClip is never assigned a starting value. If we go back and add a line of code in the Start() method such as “currentWeaponAudioClip = pistolFire” and then run it again, the code will pause again, hover over as before and instead null it will now say the name of the assigned audioClip.
Viewing variable values by using breakpoints
The above is an example of using breakpoints to view the value of a variable while at a set point while the game is running and is incredible useful throughout both general development as when implementing audio into games. Any variable can be hovered over and it’s value at that exact time will be show which can point you in the right direction when trying to find and solve any bugs. It is also a really useful technique when you are learning a new workflow as you can pause the scripts and just check to see if what you expect to happen has actually happened.
Using Call Stack
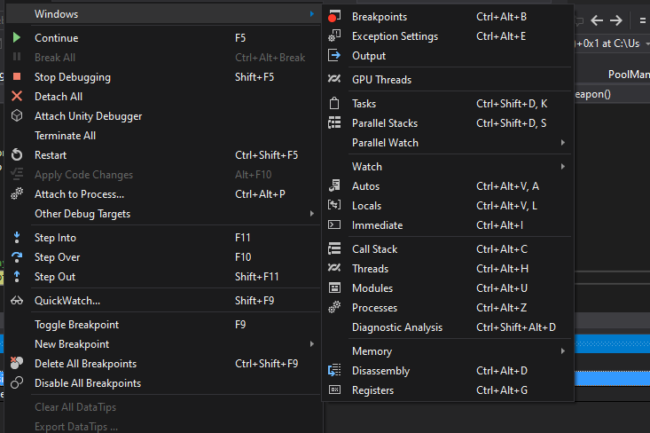
Another massively helpful technique, especially when you are first diving into a new project and need to learn how things are all working together is by using Visual Studio’s Call Stack window. When you have set a break point, “attached to Unity” and have run the game you can open up the Call Stack window by going to the menu bar and clicking “Debug > Windows > Call Stack” or Ctrl + Alt + C on Windows.
This will load a window at the bottom of you main window and will show you a list of the last relevant methods that led you to this point in the code. By double clicking on each line you can jump to view the script that in this instance brought you to this breakpoint.
I found this incredibly useful recently when implementing explosion sound effects. To play these effects as 3D sounds I needed to play the sound and also feed it the transform.position that the sound should play at. The sound was triggering when a gameObject was enabled – but when it played it was playing at the wrong transform position. By using the Call Stack window I was able to quickly track back in the project and found the problem… The transform was being set after the object was enabled, which meant the sound was played from the previous position. A couple of lines of code later and this was fixed, but had it not been for Call Stack I would have had to hunt around for a long time amongst the 30/40 relevant scripts to any references, test them and see if these were the right references before making some changes, so it was a HUGE time saver.
Oh, there’s more…
These are just a couple of useful breakpoint features that I regularly use and it is barely scratching the surface of the functionality but I cannot recommend enough about getting comfortable using these workflows when implementing game audio… Time is money!!